13 March 2020

How To Crochet Around A Wire Hanger

How to Crochet Around a Wire Hanger with image of crocheted hanger.
I would rather reuse things rather than throw them out. With this in mind, I created this tutorial for crocheting yarn around wire hangers to make them non-slip and to add a bit of padding.

Tutorial includes:
*List of supplies
*Step-by-step instructions
*Photos

Available for purchase on Etsy and Gumroad.

Reviews
★★★★★
This was soooo helpful!! I was actually able to pick it up as I read along! Thank you for breaking this down well for a beginner!!!
Buyer on Etsy

11 March 2020

How To Upcycle A Sweater To A Purse


Upcycling at it's best! Turn a pullover sweater into a purse, giving new life to an old garment.

This sewing tutorial is a PDF you download and print off.

Included is a list of supplies, step-by-step instructions and color photo illustrations.

 Get your copy today!

Upcycle A Sweater To A Purse Sewing Tutorial PDF


09 March 2020

How to Dye Fabric With Leftover Coffee Grounds

Needing new window hangings, I dyed an old sheet with leftover coffee grounds and created something for nothing!

How I Began

I made new covers for the living room throw pillows. The colors were exactly what I wanted, but after, I noticed that the blue curtains I had hanging did NOT go with the new color scheme.

Going through all the fabric I found nothing that worked. Then I remembered another garage sale sheet I had. It was white, which was too bright for what I wanted, but there was plenty of fabric.

Since the sheet was 100 percent cotton, I decided to dye it. I first consider tea dyeing, then thought coffee dyeing would produce a darker color. An internet search turned up several tutorials, and I found this one to be most helpful. What I really liked was I  reused the coffee grounds that I normally threw out each day.

Saving coffee grounds was not a problem! I took a large plastic container and added my grounds to it each day. If I had a bit of black coffee left, I poured that in as well.

What You Need


Large plastic container and left over coffee grounds.

  • Deep plastic container for soaking fabric in
  • Leftover coffee grounds

Instruction

Be sure to do this outside!!! I am serious - it will make a mess.

Large plastic container with leftover coffee grounds and water added.


1) Into the old storage container, I dumped in the coffee grounds, leftover sludge, and some additional water.

Fabric soaking in leftover coffee grounds and water.


2) Mixed it well and added the fabric, making sure there was enough liquid to cover the sheet. Then, I mixed it around and rubbed the grounds into the fabric to get a bit more color.

Close up of fabric soaking in leftover coffee grounds and water.

3) Then I let it sit and soak. After about 15 minutes, I shifted the fabric around. And waited some more. Another 15 minutes, and more shifting. And more waiting.

In all, I let it soak over an hour, trying to get the color dark enough. Then I added some vinegar to the water (the tutorial I referenced suggested using alum, which I did not have, or vinegar. I didn't really measure it, just poured some in - probably about 1/3 cup) and let it soak about 15 more minutes.

Fabric draped over plastic patio furniture to dry.

 
4) I pulled out the sheet, wrung out as much liquid as I could, and draped the sheet over my patio table and chairs to dry. Since I did not rinse the sheet (because I did not want to remove the color) there were a lot of coffee grounds stuck to it. They do fall off as the fabric dries which is why this project should be done outside! I dumped the grounds and liquid in the grass.

Close up of the dried fabric.


5) On a warm and breezy day, the fabric should dry in a few hours (and out of the sun, so it wouldn't bleach any of the color out). I shook it well to get all the dried coffee grounds off and looked at the color. It was pretty much what I expected.

Then I used a dry iron to iron the fabric and help set the color.

Final Thoughts

And that's it - dyeing with coffee. It really was easy to do, a bit of a mess, but easy to clean up if done outside. And as an added bonus - it cost nothing! I was able to reuse an old sheet and used coffee grounds instead of throwing them away. 


How to Upcycle a Sweater to a Purse with pictures of pullover sweater cut apart then remade as a purse.


If you like to sew, check out my tutorial How To Upcycle a Sweater to a Purse. Don't throw out that old pullover sweater - upcycle it to a new purse. Step-by-step illustrated instructions are available on Etsy and Gumroad.


06 March 2020

How To Crochet a Granny Square Christmas Stocking Decoration

Looking for more Christmas decorations for your tree? If you have a leftover supply of yarn you can crochet granny square. When sewn together, it looks a bit like a Christmas stocking and can be hung on your tree or around your home.

Two granny square Christmas stockings, one red with white edging, the other white with red edging.

Granny squares are easy to make, making them the perfect project for someone who has learned the basic crochet stitches. They are a great project to carry around with you because they are small and easily transported - no need to haul that afghan with you.

Granny squares can be joined to make scarves, blankets, and wraps. An internet search for “crochet granny squares instructions” will turn up many results, often with pictures, so I'll only cover the basics here.

You can select any yarn and hook size you want. The larger the hook, the larger the final square will be. Play around with different yarns and hooks to find the look you like best. You can also use one yarn throughout or change yarns as you go, depending on how much yarn you have and the look you want.

To begin, make a foundation ring by chain 4; join the last loop to the first chain with a slip stitch and pull through. 

Round 1: *3 double crochet in ring, chain 2; repeat from * 3 times.
Round 2: *3 double crochet, chain 2, 3 double crochet in the 2 chain space, chain 1; repeat from * 3 times
Round 3: *3 double crochet, chain 2, 3 double crochet in the 2 chain space, chain 1, 3 double crochet in next space, chain 1; repeat from * 4 times
Round 4: *3 double crochet, chain 2, 3 double crochet in the 2 chain space, chain 1, 3 double crochet in the next space twice, chain 1; repeat from * 3 times.

(You can use the same yarn throughout, or you can change - with each round, only on one round, or for the single crochet edging. Play around with it and see which look you like. This is also a great way to use up leftover bits of yarn you have around. If you have enough for two rounds, use it, then switch over to another. Experiment, play, and see what you create!

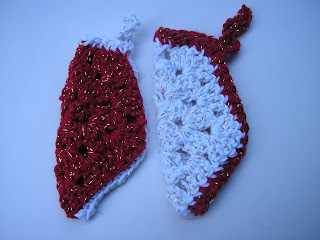
The granny square is now finished!

To make the stocking, fold the square in half. With the same hook and same or different yarn, join the bottom and side together with a single crochet stitch. Put the hook through a chain on both layers; pull yarn through both layers and finishing stitch.

When you reach the top of the “stocking” continue with the single crochet stitches, but only go through one layer (so you will need to circle around the top of the stocking. When you complete the round, join with a slip stitch to the first single crochet. If you want a hanging loop, then chain stitch to twice the desired length of the loop you want; bring hook down and slip stitch next two first chain of the loop. Finish off.

Or, you can thread a needle with yarn and sew the edges together.

You now have a granny square stocking! Isn't it cute!

Finished granny square Christmas stocking, white with red edging.

And now - what can you do with these?

They look really cute hanging from the Christmas tree:

Two granny square Christmas stockings hanging in a tree.

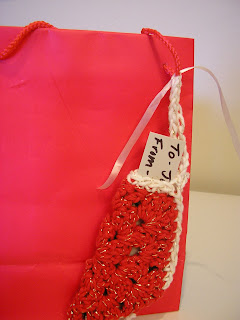
They can also be used to hold the To/From cards on holiday packages:

A granny square Christmas stocking holding a gift tag.
Another granny square Christmas stocking holding a gift tag.

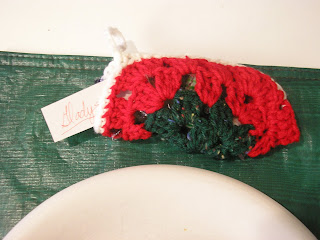
As well as placecard holders for your holiday dinner table. Add a few pieces of candy and let the guest takes these home.

Granny square Christmas stocking used as a placecard holder at a dinner table.

What other uses can you think of for these?


How to Crochet Around a Wire Hanger with image of crocheted hanger.


If you like to crochet, you may enjoy my tutorial How To Crochet Around a Wire Hanger. This makes them non-slip and adds a bit of padding. The tutorial is available on Etsy and Gumroad.